
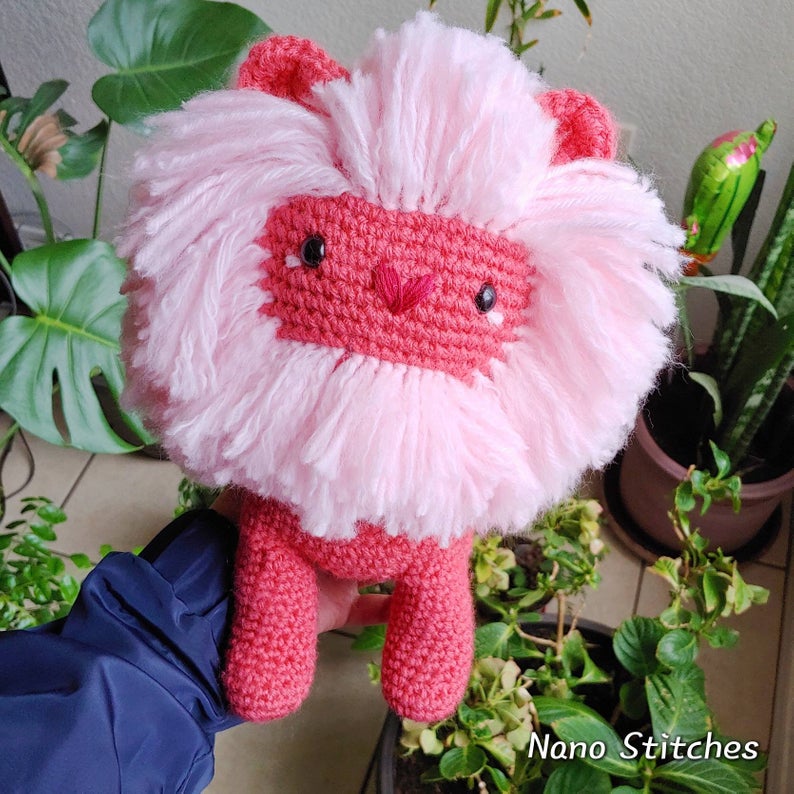

I’m so excited to share one of my favorite patterns so far! This could be the perfect gift for a Steven Universe fan.
I designed this piece inspired by the season finale (Change your Mind). It made me so nostalgic about the show that I started working on this little lion right away!
I hope you fellow makers will have as much fun making this project as I did! It ends up being a super fluffy piece you just want to dig your face into ♥
If you’d like a printable and ad-free version of this pattern you can find it here.
If you have any questions or concerns, don’t hesitate to contact me,
Happy Crocheting!
– Diana
Dimensions slightly vary depending on each person’s tension.
Materials Needed:
- E/4 – 3.50mm Crochet Hook
- Medium Weight Yarn [Red Heart Super Saver yarn in colors “Flamingo” (bright pink) and “Baby Pink” (pastel pink)]
- Polyester Fiberfill (aprox. 6 oz)
- 12mm safety eyes for amigurumi
- 3-4 feet of dark pink embroidery floss
- Scissors
- Yarn needle (metal recommended), and sewing needle (for when using the embroidery floss)
- Sewing Pins (about 10)
- Stitch Marker (improvised markers: paper clip, bobby pin, piece of different color yarn)
- Brush (for the mane)

Pattern
The definitions for all crochet abbreviations used can be found here.
Everything but the mane will be worked in the Bright Pink (Flamingo) yarn.
LION HEAD
WORKED IN THE ROUND
- Round 1: MC, 6sc (6) set your marker
- Round 2: 6 sc inc (12)
- Round 3: (1sc, 1 sc inc) x6 (18)
- Round 4: (2sc, 1 sc inc) x6 (24)
- Round 5: (3sc, 1 sc inc) x6 (30)
- Round 6: (4sc, 1 sc inc) x6 (36)
- Round 7: (5sc, 1 sc inc) x6 (42)
- Round 8: (6sc, 1 sc inc) x6 (48)
- Round 9: (7sc, 1sc inc) x6 (54), set marker again
- Round 10-17: sc around (7 rounds) (54) move your marker after round 17
- Round 18: (7sc, sc dec) x6 (48)
- Round 19: (6sc, sc dec) x6 (42)
- Round 20: (5sc, sc dec) x6 (36)
- Round 21: (4sc, sc dec) x6 (30)
- Round 22: (3sc, sc dec) x6 (24) now’s a good time to add the eyes and start stuffing with fiberfill!

To add the eyes you will need two 12mm safety eyes and their backings. Place them around the middle row of your work with 11 single crochet stitches between both eyes (refer to image).
After placing the eyes, stuff generously and leave the bottom of your work open, this will serve as a guideline when sewing, leave a long tail of yarn left for sewing (about 2.5 feet).
LEGS
Worked in the round. You will need to make FOUR legs, total.
- Round 1: MC, 6sc (6) set your marker
- Round 2: 6 sc inc (12)
- Round 3: (1sc, 1 sc inc) x6 (18)
- Round 4 – 5: sc all around for 2 rounds (18)
- Round 6: 3sc dec, then sc 12 (15) set your marker again
- Round 7 – 15: sc all around [9 rounds (15)]
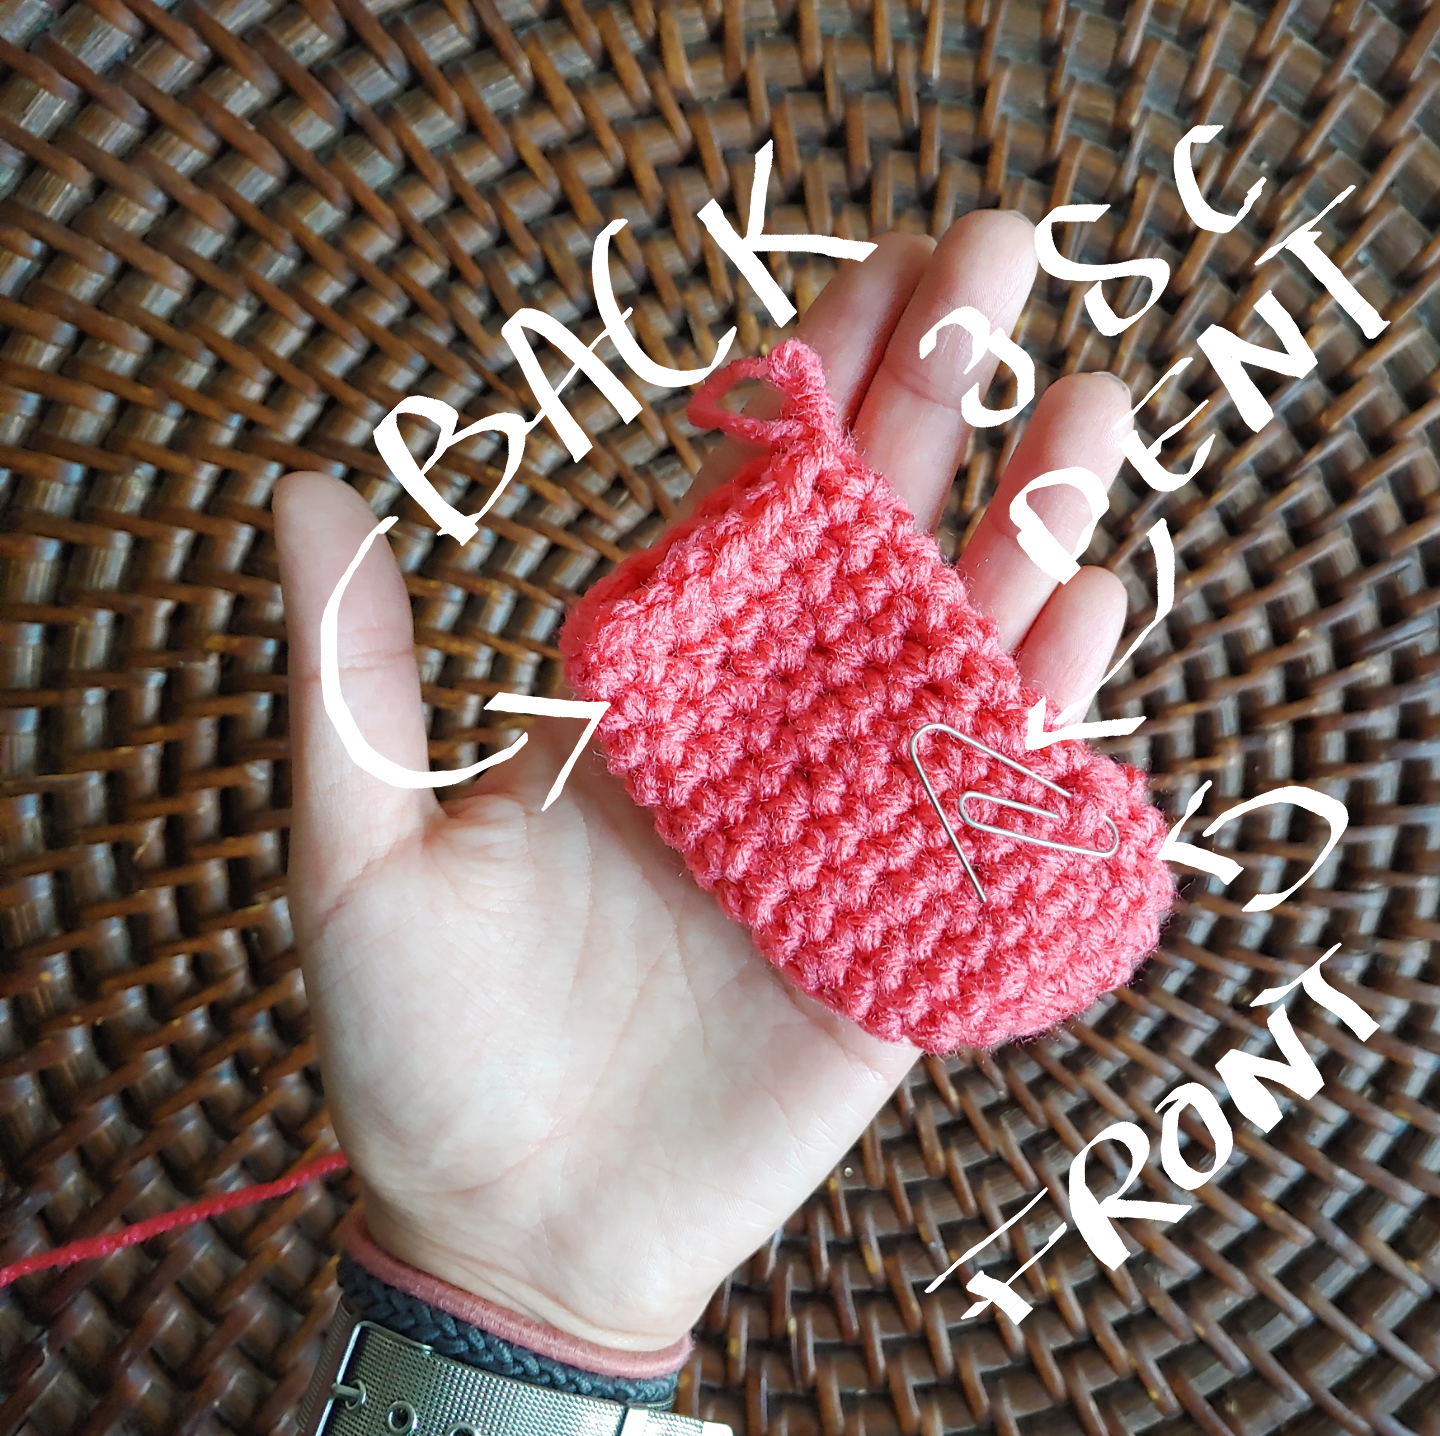
If you flatten up the leg, the dent made by the 3sc dec’s should be quite visible to you. The stitch where you finish your 9 sc rows should align with the middle of the dent. Ch 1 and fasten off, except for the very last leg.
After you have finished making 4 legs, flatten them up so that you make sure you finished on the right stitch, the one right opposite to it will be called the back stitch.

BODY
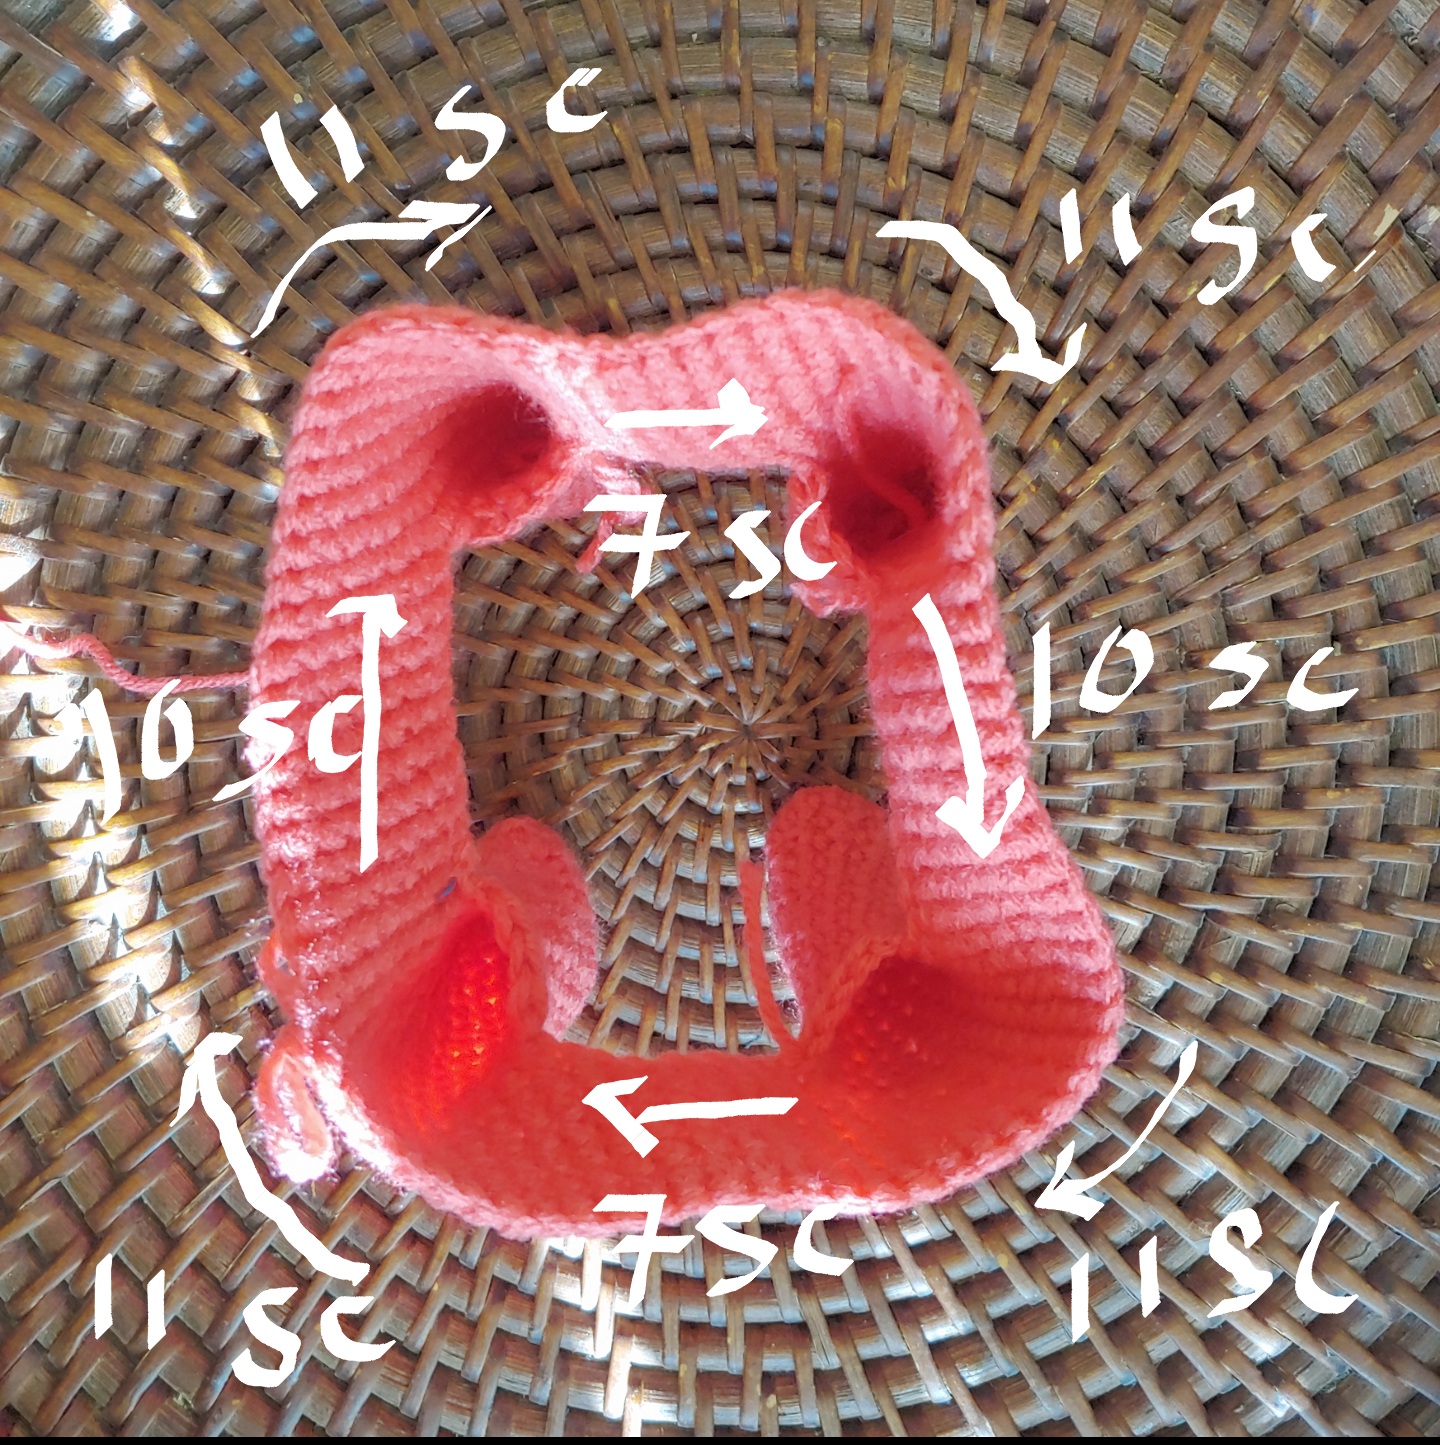
Grab the last leg that you made, the one that still has the working yarn attached to it and ch 10.
Grab the next leg (leg 2) and sc into the back stitch of leg 2, sc 10 for a total of 11 sc, ch 7.
Grab next leg (leg 3), you’ll need to attach the new yarn onto the left side of leg 3. To figure out where to attach the yarn, flatten up leg 3 to find the front stitch and count 4sc to the left, sc onto that stitch and sc 10 for a total of 11 sc, you should now be on the back stitch of leg 3, ch 10.
Grab the last leg (leg 4) and sc onto the front stitch of leg 4, then sc 10 for a total of 11 sc, you should now be on the left side of leg 4.

The last step is to close the cycle by joining leg 4 to the right side of leg 1, flatten leg 1 to find its side stitch and count 4sc from the back of leg 1, sc onto that stitch and sc 10 for a total of 11sc. Place marker here.
Sc around everything for 7 rows, grabbing only one of the outside loops of the chains when going around them. The inside loops will be used when closing the belly. (78)
After 7 rounds it is time to start decreasing at the corners; the start of round 1 is 7 rows on top of where your maker was, now move it to the top.
- Round 1: Sc 15 and do a sc dec, sc 17 and sc dec, sc 20 and sc dec, sc 17 and do a sc dec.
- Round 2: Sc 19 and sc dec (you’ll notice you are now decreasing on top of last rows decreases), sc 16 and sc dec, sc 19 and sc dec, aside from decreasing at the corners, we will now start decreasing at the butt 🙂
Sc 6 and sc dec (butt), sc 6 and sc dec again. - Round 3: Sc 18 and sc dec, now we’ll start decreasing at the front as well, (sc 6, sc dec) x2. Sc 18 and sc dec, sc 4 and 2 sc dec, sc 4 and sc dec.
- Round 4: Sc 17 and sc dec, (sc 5 and sc dec) x2, sc 17 and sc dec, sc 1, 3 sc dec, and sc 1, sc dec.
- Round 5: Sc 16 and sc dec, (sc 4 and sc dec)x2, sc 16 and sc dec 4.
- Round 6: 15 sc and sc dec, sc 1, sc dec 2, sc 1, sc dec, sc 15 and sc dec 4.
- Round 7: 14 sc and sc dec 3, 14 sc and sc dec 2
- Round 8: 13 sc and sc dec 3, 13 sc and sc dec 1, sl st and fasten off .

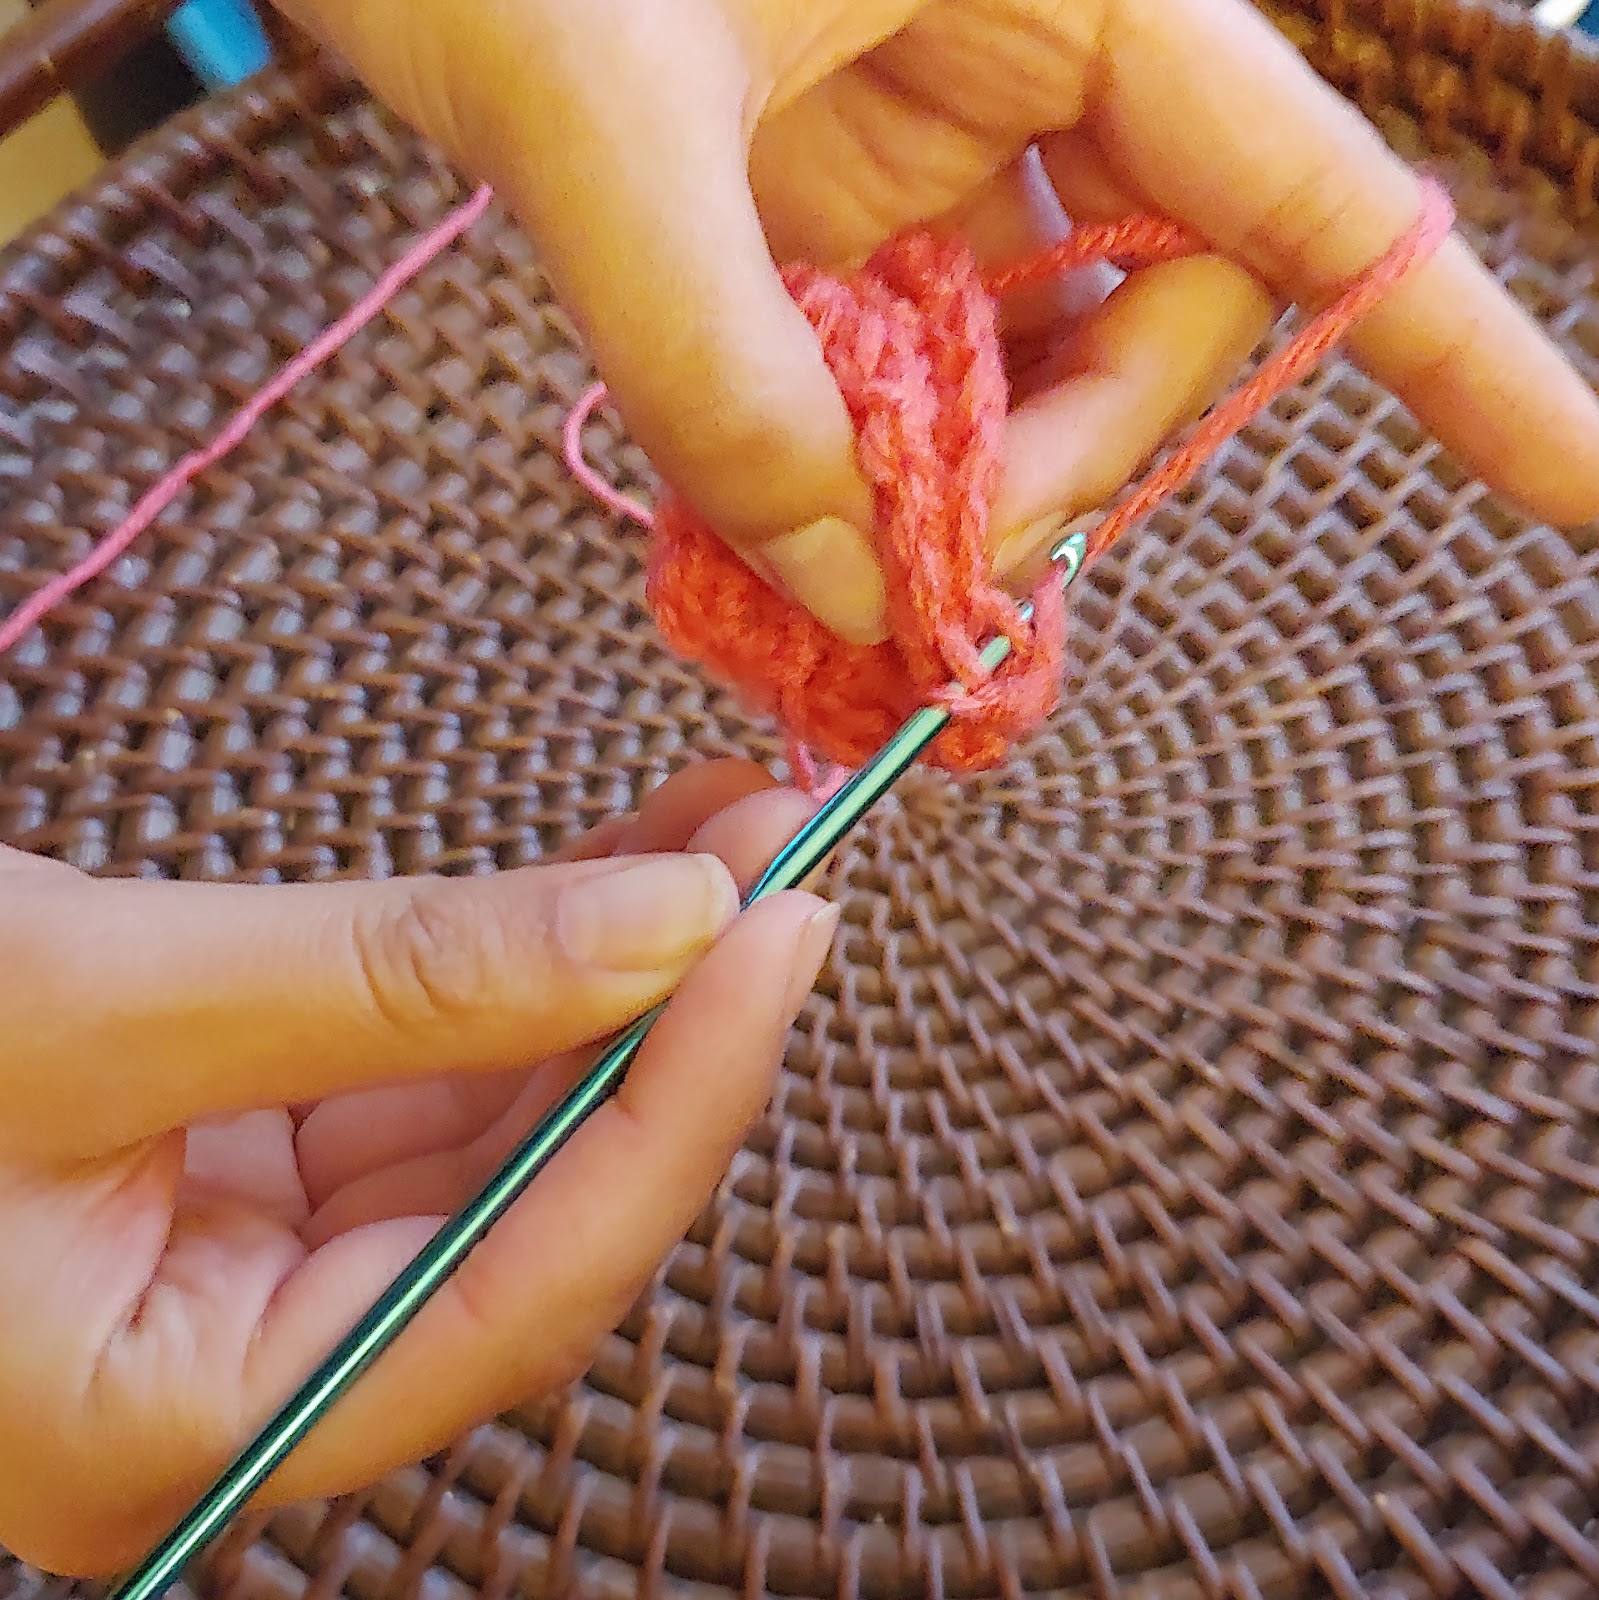
We will now finish closing the back with slip stitches, but if we do it from the outside it will look bumpy and weird, so you need to work from the inside. Cut 1ft of yarn and pass it through the opening to the other side (pictured).

Join both sides by slip stitching the single crochets together, for a more seamless look, do it by grabbing the inside loops of the sc’s (pictured)

Continue until you have used all stitches and the opening is closed, ch 1 and fasten off.


Now it’s time to stuff the legs!! Don’t stuff the whole body just yet, we’ll do that once we get started on closing the belly.
CLOSING THE BELLY
- Round 1: Sl st into the middle of the back (see picture), sc 6 and sc dec, sc 14 and sc, sc 10 and sc dec, sc 14 and sc dec, sc 5 and sc dec( in the middle of the back).
- Round 2: Sc 4 and sc dec, sc 13 and sc dec, sc 3 and sc dec (in the middle of the front), sc 3 and sc dec, sc 13 and sc dec, sc 4 and sc dec (back).
- Round 3: Sc 3 and sc dec, sc 12 and sc dec, sc 3 and sc dec (front), sc 2 and sc dec, sc 12 and sc dec, sc 3 and sc dec (back).
- Round 4: Sc 2 and sc dec, sc 11 and sc dec, sc 2 and sc dec (front), sc 1 and sc dec, sc 11 and sc dec, sc 2 and sc dec.
- Round 5: Sc 1 and sc dec, sc 10 sc dec, sc 1 and sc dec (front), sc dec, sc 10 and sc dec, sc 1 and sc dec.
- Sc dec, sc 9 and sc dec, 2 sc dec, sc 9 and finish off with 2 sc dec.
Now’s the time to stuff the belly! You can make it as squishy as you want, and afterwards close the opening with slip stitches.
EARS
You’re going to make two of these for each ear, so you’ll need four in total.
- 1: Ch 7, skip the first 2 chains and hdc into the 3rd chain across. Hdc 3 more time for a total of 4 hdc.
- 2: On the last available chain make 5 hdc.
- 3: Continue working under the stitches that you just make (kind of like making a U turn), hdc 4 across and ch 2.
- 4: TURN work, hdc 6 across, and then hdc 3 into the same stitch (at the top), hdc 6 across. Ch 1 and fasten off. Leave a long yarn tail on the last two pieces that you make, using this tail, attach two pieces together back to back with slip stitches as shown:
Attach the completed ears to the top if lion’s head and sew them in place.
MANE
You’ll need to attach a “hair” strand to every single sc post around your lion’s head except for the indicated stitches around the face. Using the pastel pink yarn cut 9 inch long strands, I used close to 470 strands:

Using the eyes as reference, stop adding strands 3 rows above, 4 rows below, and 3 stitches to the sides.

You’re off to the most fun part now! Your mission is to brush all of the mane strands until they’re fluffy and look like actual fur!
I used this dog brush that I found at the dollar store because I didn’t want to damage an actual hair brush, plus the very fine wires on this brush make it way easier to break the yarn stands apart. Just be patient and thorough!

After all the brushing you’ll need to give lion a little haircut by trimming around an inch of the mane. I just went ahead and cut off just enough to make it like a fluffy afro and made the top quite shorter than the rest of it all. After you finish trimming you’ll need to brush all the little fibers away with a less abrasive brush.
TAIL
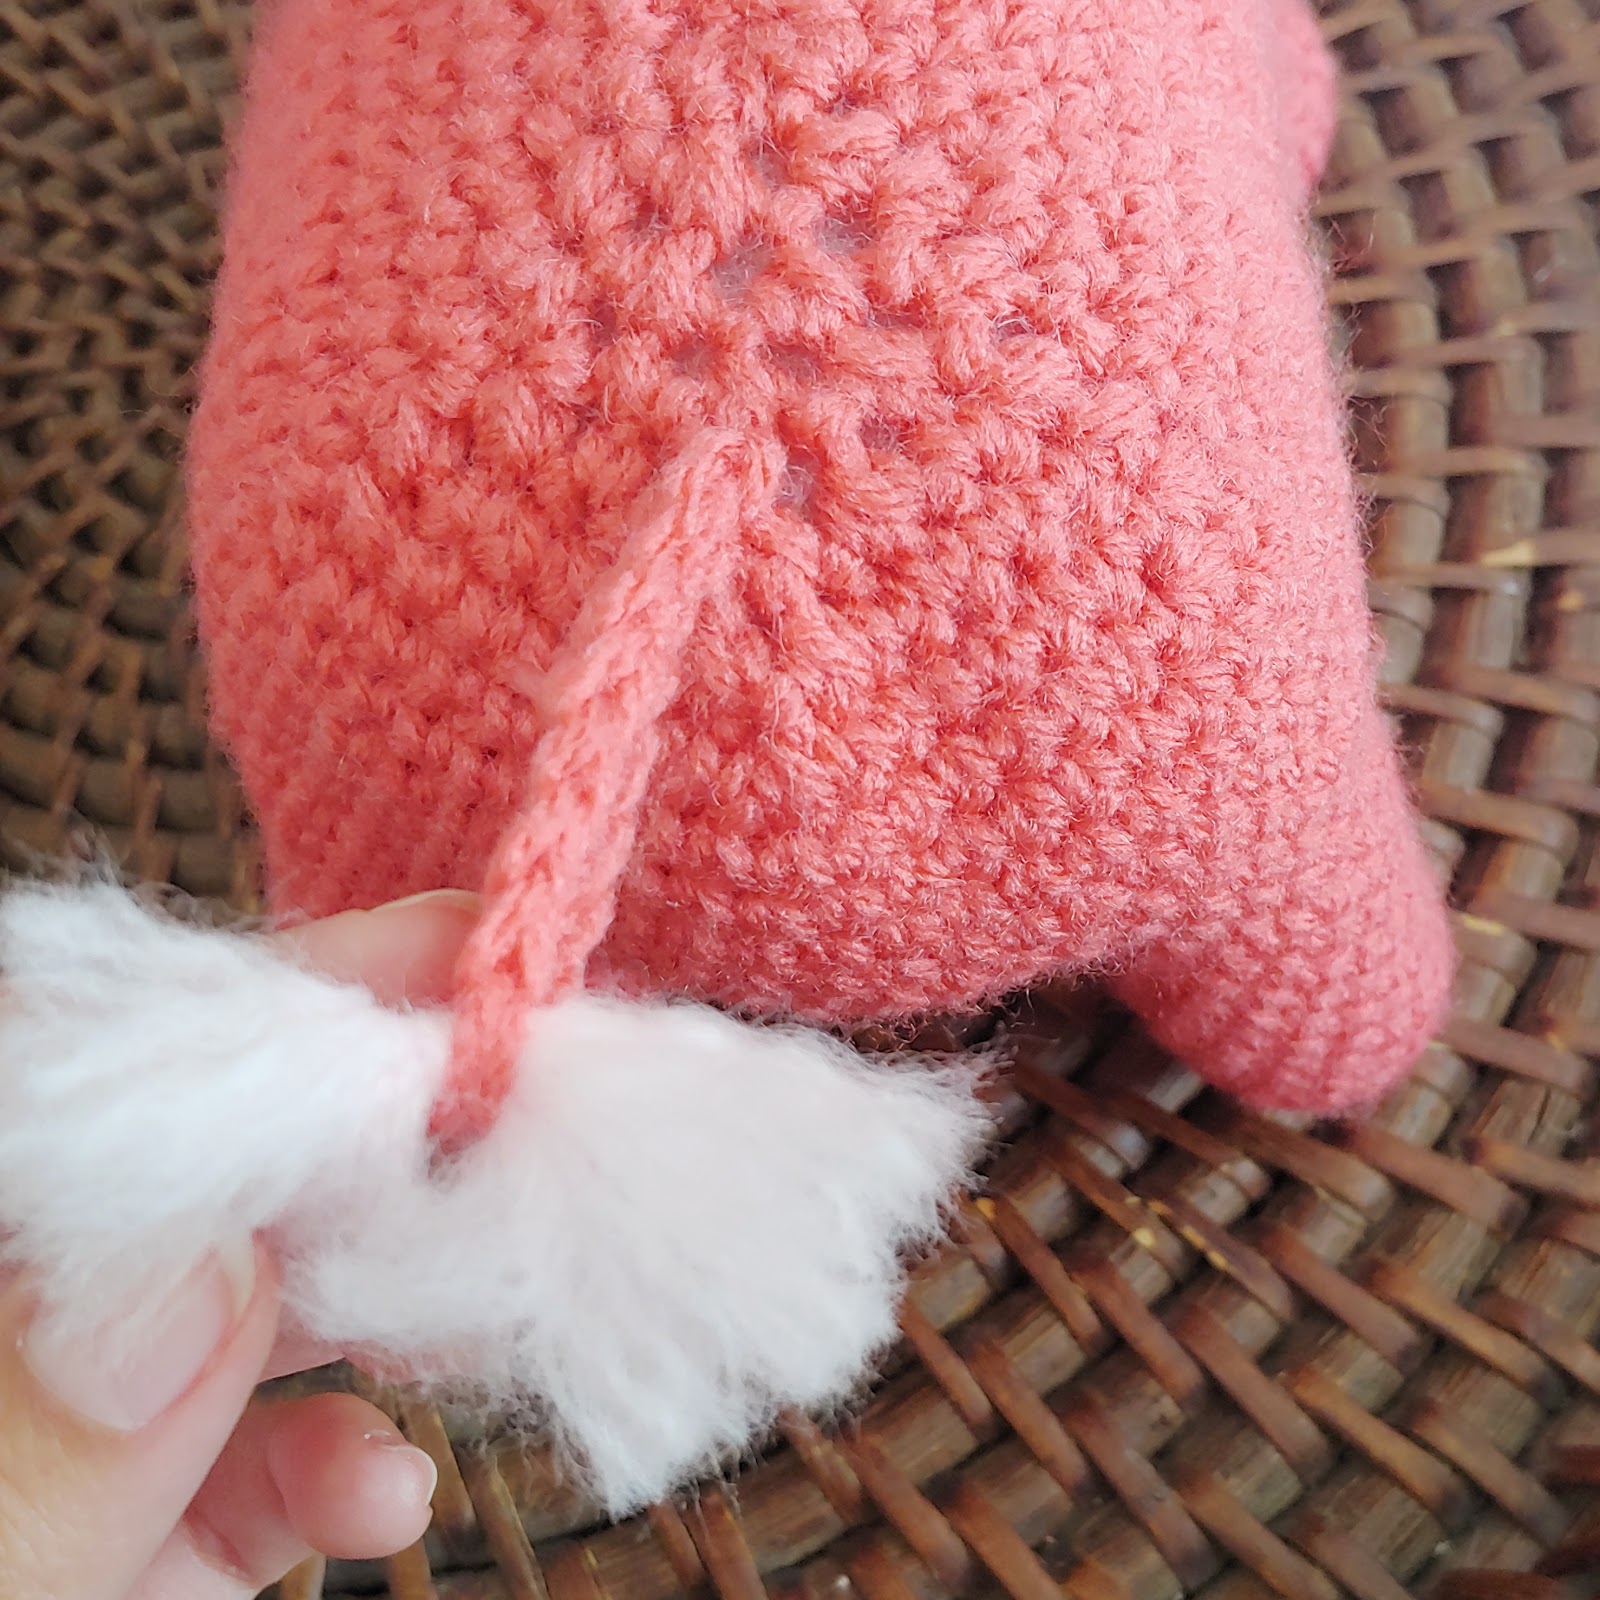
Make 8 pastel pink strands that are 4.5 inches long and use another strand to tie them up in the middle, brush both ends until fluffy and don’t fold them in half just yet.
Using the bright pink yarn, ch 9, and slip stitch onto the back of the body of your lion and sc 7 from the second chain from the hook, place the fluffy strands next to the single crochet you just made and “trap” them by doing a single crochet on the last chain and fasten off. Weave in the remaining strands of yarn and brush the fluffy part so that you can hide the middle fold. Trim the ends just like you did with the mane.
FINISHING TOUCHES
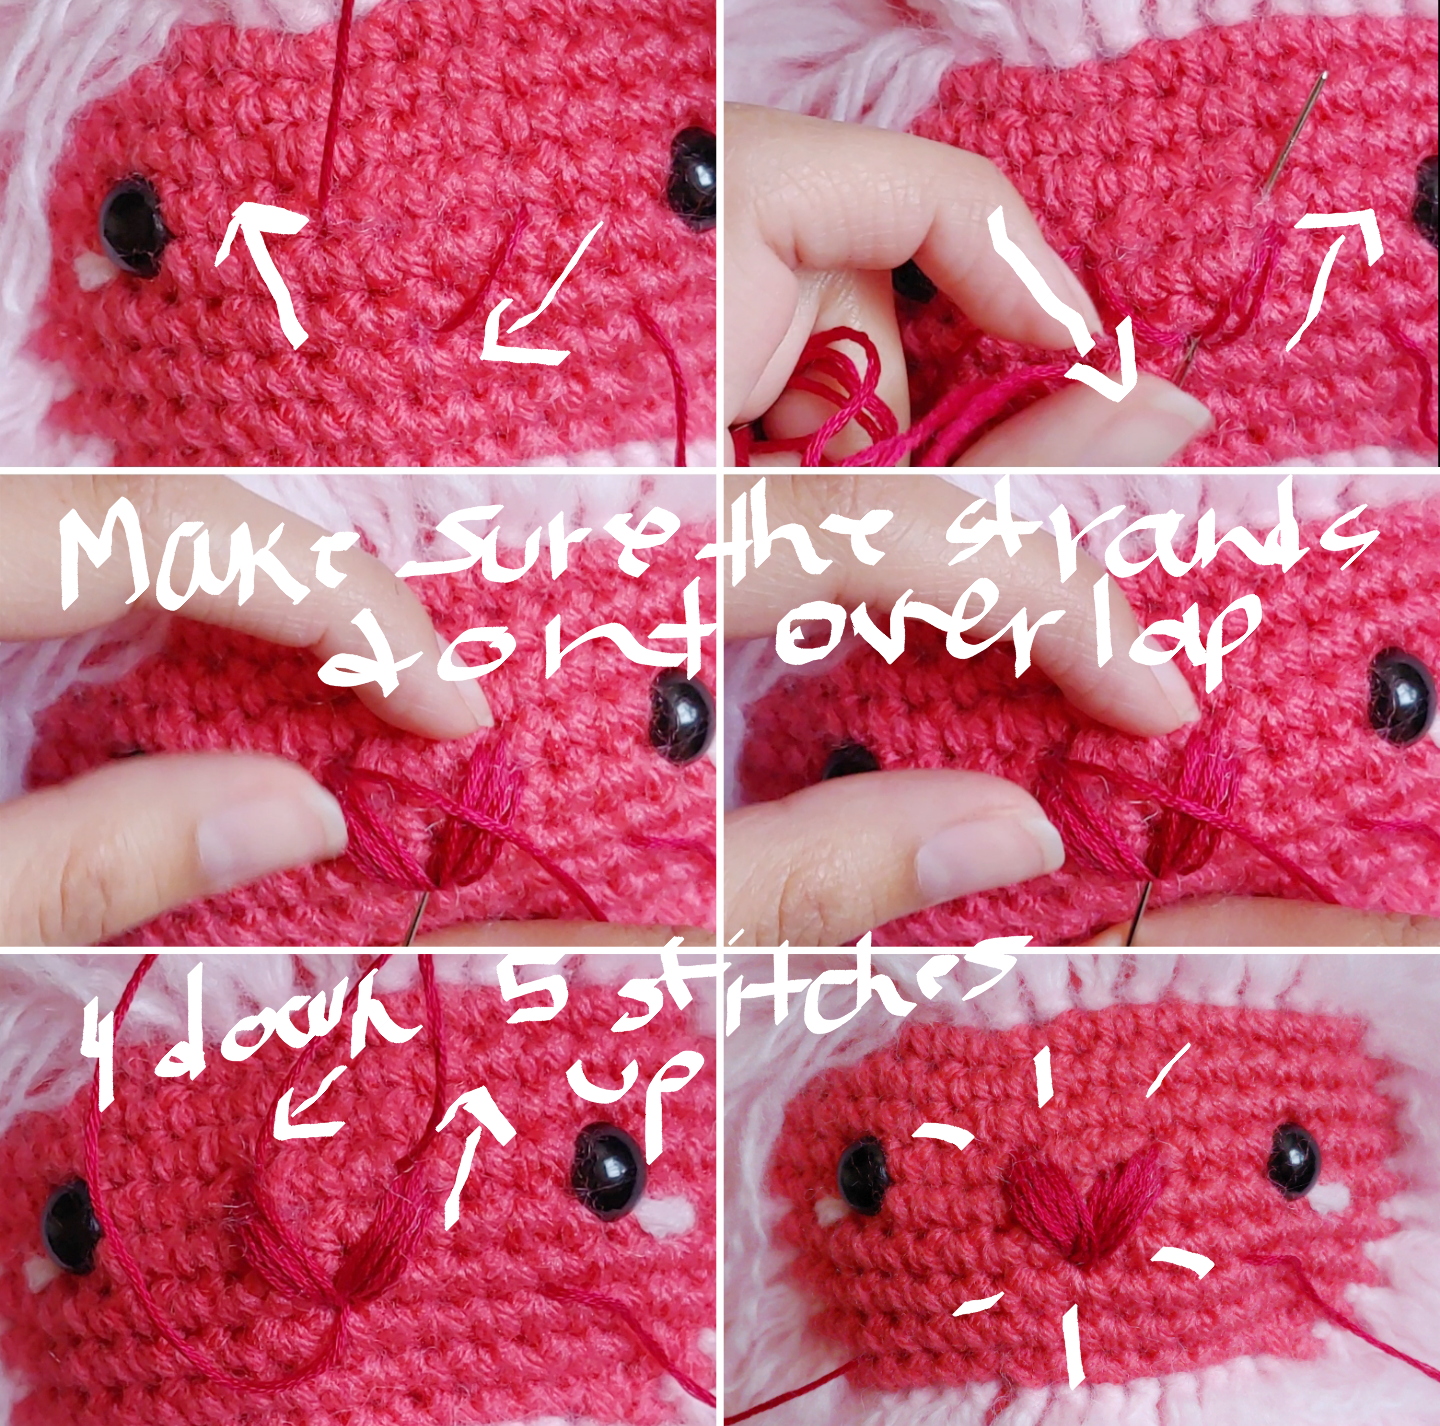
You’re going to make a “V” shape in the middle of Lion’s face, 4 stitches across and 3 rows down. Follow the diagram to the right, every time you come down go into the same space but every time you go up go slightly higher until you have 5 strands on each side and then start going slightly lower to create a “heart” shape, keep lowering your stitches until you have 4 strands on each side and then hide the ends strands of embroidery floss.
Using the light pink yarn add those simple blush bits on the corners of lion’s eyes (about 2 sc long) and you’re done!!

I’D LOVE TO SEE YOUR PROJECTS! IF YOU HAVE PROGRESS PICTURES OR WANT TO SHARE YOUR FINISHED PROJECT PLEASE TAG NANO STITCHES ON SOCIAL MEDIA!
You may sell your product providing pattern credit to Nano Stitches on Instagram, Etsy, Facebook, Twitter, Pinterest, Ravelry or any other social media in which you advertise. The pattern itself shall not be copied. If you sell the items you must use your own pictures for advertising. If you need assistance during the process or find someone else selling my pattern feel free to contact me on social media or email me at nanostitches9@gmail.com