
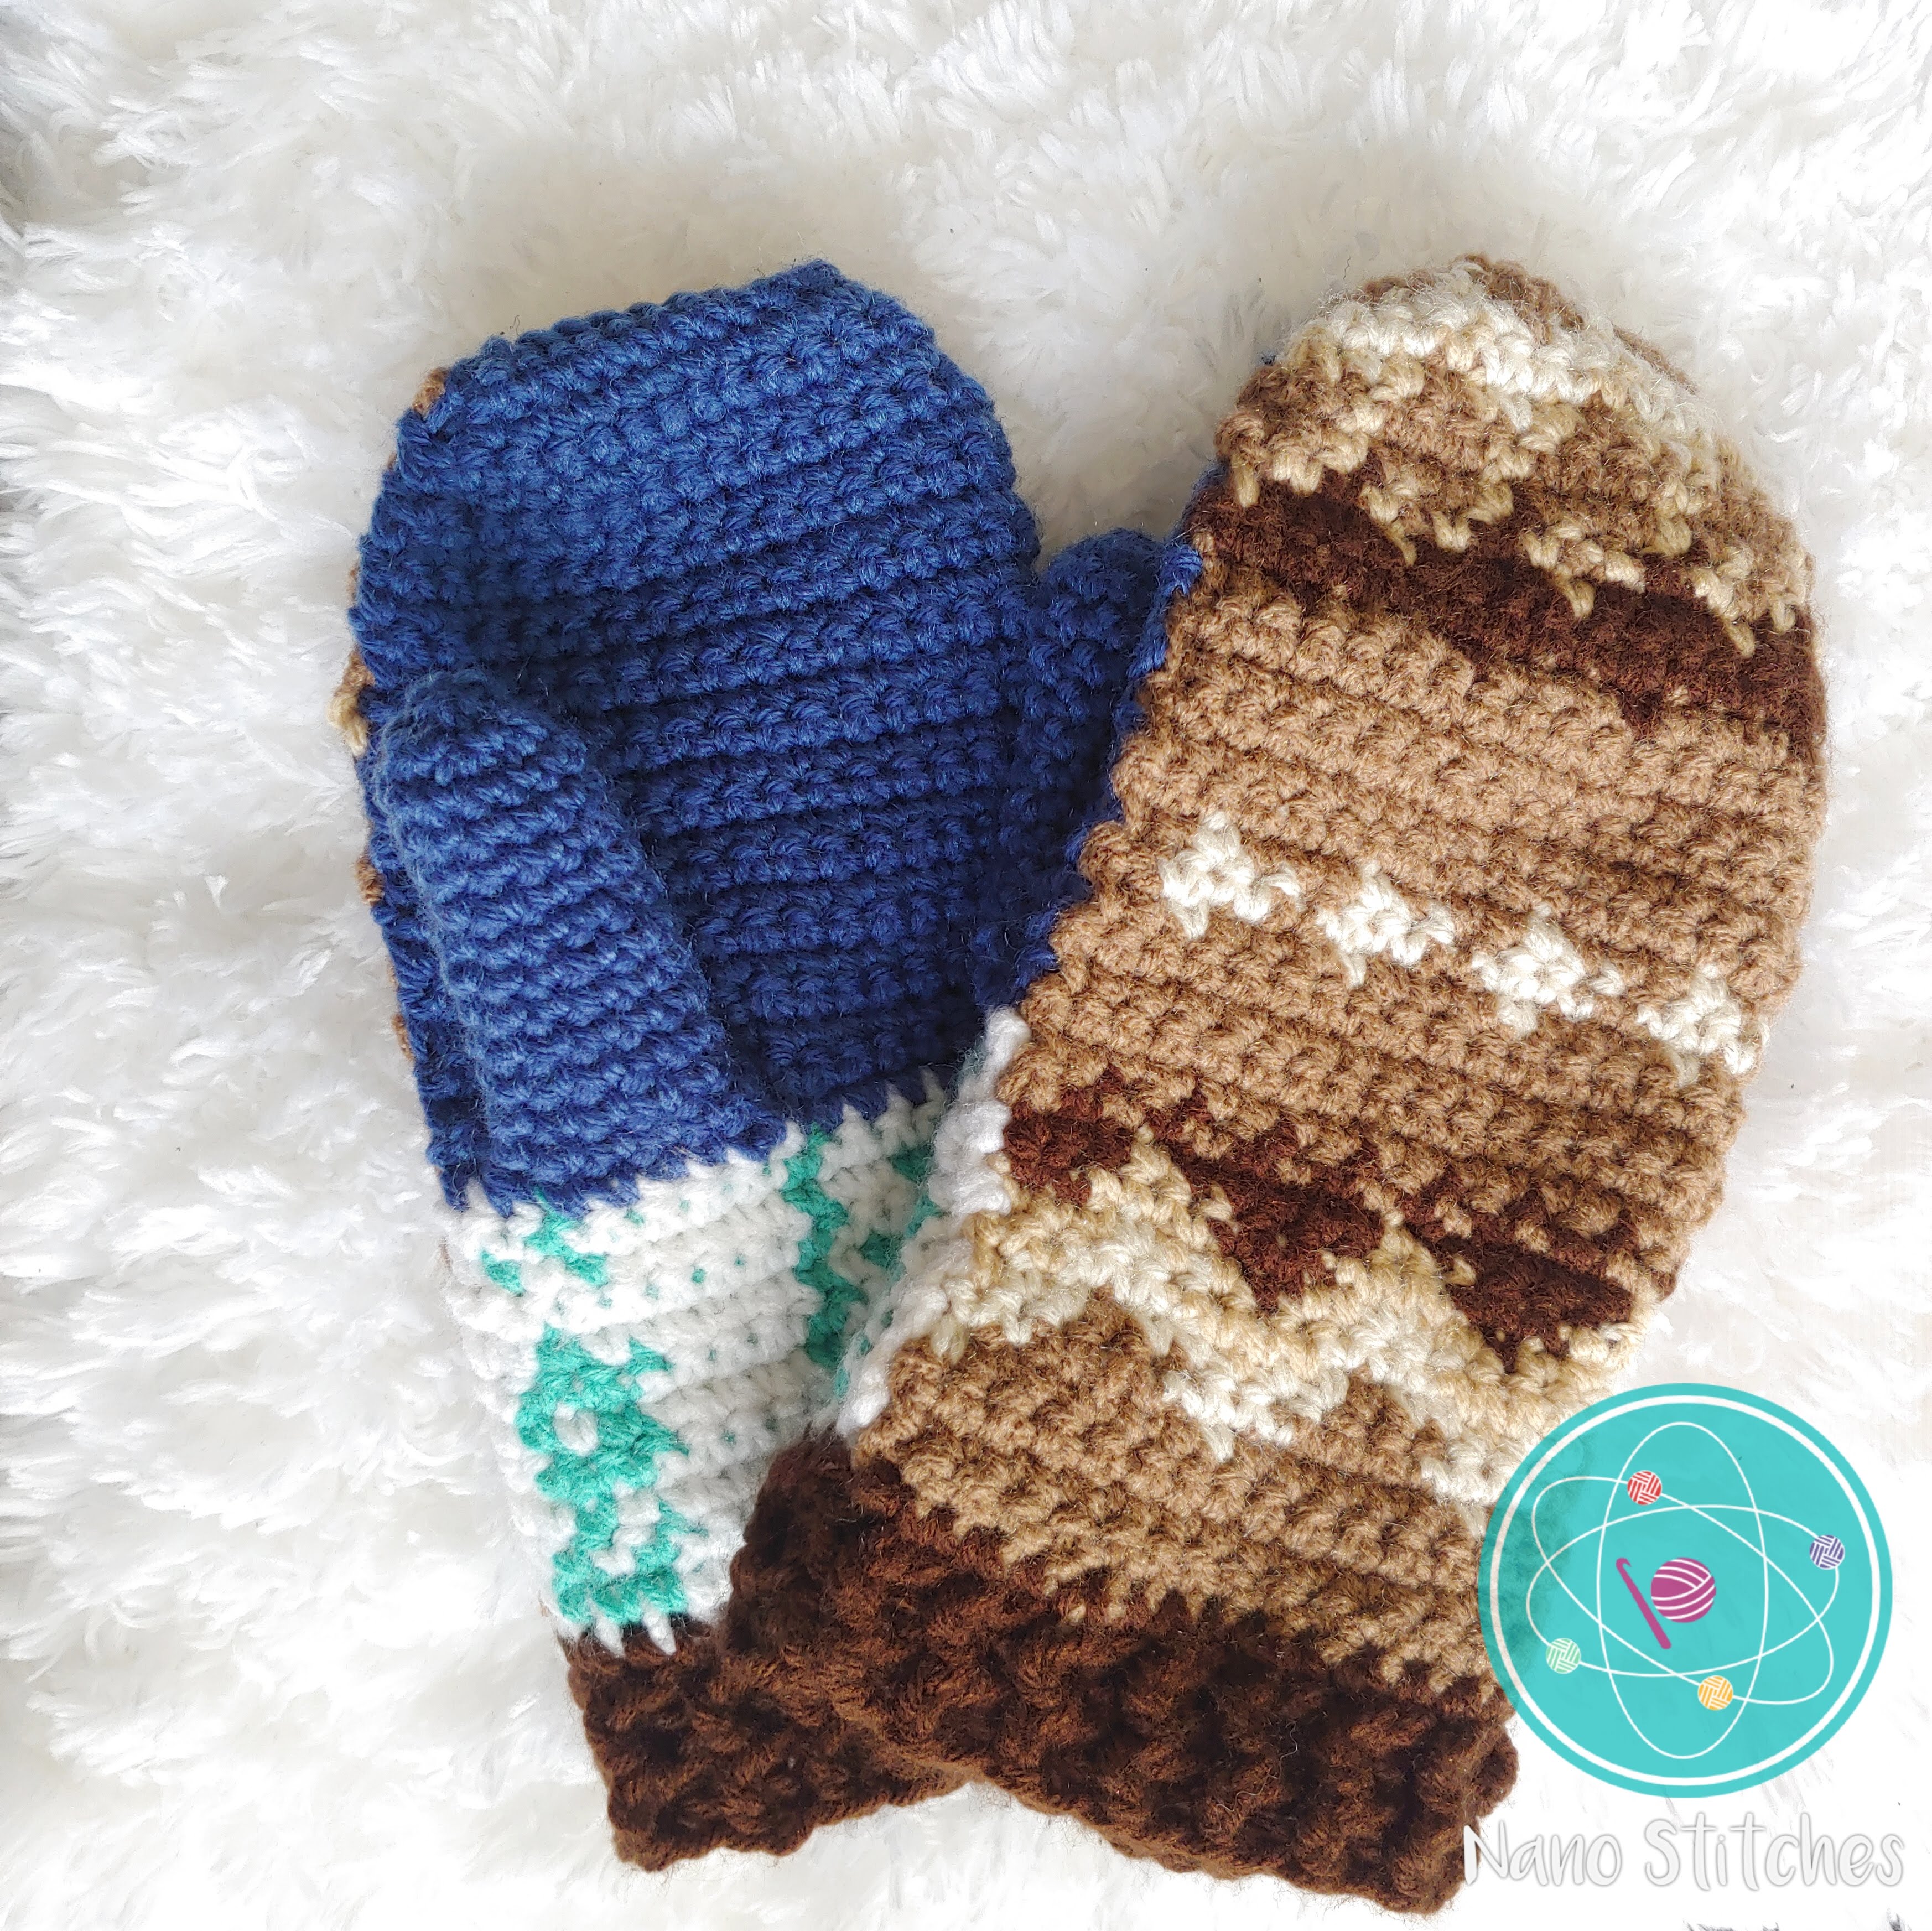
Just like you, I’ve been getting non-stop requests from friends and family asking me to make them some “Bernie Mittens”, so I had to give it a try. Though I’ll be keeping the first pair to myself (because I hadn’t done colorwork in a while and they were more like my rough draft).
If you’ve seen the thousands of memes around the place and you’d like to have your very own pair of meme mittens, you’re in the right place!
The ad-free and printable version of this pattern can be found here.
Let’s get to crochetting:
Abbreviations:
- MC: Magic circle
- Ch: Chain
- Sc: Single Crochet
- Sl st: Slip Stitch
- Sc dec: Single crochet Decrease
- Bp dc: Back post double crochet
- Fp dc, Front post double crochet
- (xx): Numbers in bold mean stitch count at the end of each round
Gauge:
In a 1 inch by 1 inch square of stitches there should be 4sc and 4 rows of sc.
9 inches tall by 4.25 inches wide. Modification suggestions for longer hands included.
Materials Needed:
- 4.50mm Crochet Hook
- Medium Weight Yarn in Dark Brown, Light Brown, Beige, Light Beige (or White), White, Teal, and Navy. (I used scraps of Red Heart Super Saver yarn that I already had)
- Scissors
- Yarn needle (metal recommended)
PATTERN
NOTES
Make two front panels and two back panels. Later on you will sew them together.
The number in parenthesis is the number of stitches you should make in the indicated
color, for example: DB (10) means: “sc 10 in Dark Brown.” And LB (5) means: “sc 5 in Light Brown”
If you need a tutorial on how to do color changes you can refer to this video:
Or you can always ask for help 🙂
For instructions about adding length to the mittens, refer to row 15 of the “Front Panel” written instructions.
When the first sc on the next row is a different color than the last sc of the bottom row:
Switch to the next color when finishing the last sc, ch 1 with the new color, turn around and sc as usual.


Front Panels:
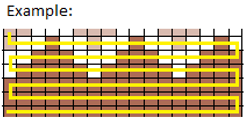
Start at the bottom left corner and “zig-zag” your way up as shown in the example picture. Repeat twice to have two panels.
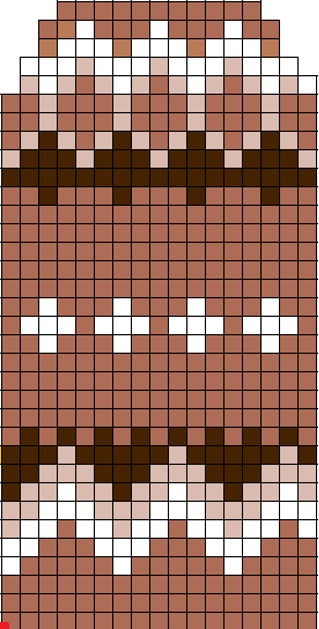
- DB: Dark brown
- LB: Light brown
- W: White, (you can also use a
lighter shade of beige for this) - B: Beige
Starting with Light Brown yarn:
- Ch 18, turn, skip the first chain and sc across (17)
- Ch 1, sc across (17)
- Ch 1, sc across (17)
- Ch 1, LB (4), W(1), LB (5), W(1), LB (5), W(1) (17)
- Ch 1, W(2), LB(3), W(3), LB(3), W(3), LB(3) (17)
- Ch 1, W(1), LB(1), W(1), B(1), W(2), LB(1), W(2), B(1), W(2), LB(1), W(2), B(1) (17)
- Ch 1, B(2), W(3), B(3), W(3), B(3), W(3) (17)
- Ch 1, B(1), W(1), B(2), DB(1), B(2), W(1), B(2), DB(1), B(2), W(1), B(2), DB(1) (17)
- Ch 1, DB(2), B(3), DB(3), B(3), DB(3), B(3) (17)
- Ch 1, DB(1), B(1), DB(5) , B(1), DB(5), B(1), DB(3) (17)
- Ch 1, LB(1), DB(1), LB(1), DB(1), LB(1), DB(1), LB(1), DB(1), LB(1), DB(1), LB(1), DB(1), LB(1), DB(1), LB(1), DB(1), LB(1) (17)
- Ch 1, LB(17) (17)
- Ch 1, LB(17) (17)
- Ch 1, LB(17) (17)
- Ch 1, LB(17) (17) (If you need mittens that are more than 9’’ long, add extra sc LB rows here. 4 extra rows for every inch you need. For example: 2 extra rows = ½’’ more.)
- Ch 1, LB(2), W(1), LB(3), W(1), LB(3), W(1), LB(3), W(1), LB(2) (17)
- Ch 1, LB(1), W(3), LB(1), W(3), LB(1), W(3), LB(1), W(3), LB(1) (17)
- Ch 1, LB(2), W(1), LB(3), W(1), LB(3), W(1), LB(3), W(1), LB(2) (17)
- Ch 1, LB(17) (17)
- Ch 1, LB(17) (17)
- Ch 1, LB(17) (17)
- Ch 1, LB(17) (17)
- Ch 1, LB(17) (17)
- Ch 1, LB(2), DB(1), LB(3), DB(1), LB(3), DB(1), LB(3), DB(1), LB(2) (17)
- Ch 1, DB(17) (17)
- Ch 1, B(1), DB(3), B(1), DB(3), B(1), DB(3), B(1), DB(3), B(1) (17)
- Ch 1, LB(1), B(1), DB(1), B(1), LB(1), B(1), DB(1), B(1), LB(1), B(1), DB(1), B(1), LB(1), B(1), DB(1), B(1), LB(1) (17)
- Ch 1, LB(2), B(1), LB(3), B(1), LB(3), B(1), LB(3), B(1), LB(2) (17)
- Ch 1, LB(2), B(1), LB(3), B(1), LB(3), B(1), LB(3), B(1), LB(2) (17)
- Ch 1, 1 Beige sc dec, W(1), B(1), LB(1), B(1), W(1), B(1), LB(1), B(1), W(1), B(1), LB(1), B(1), W(1), 1 Beige sc dec (15)
- Ch 1, W(3), B(1), W(3), B(1), W(3), B(1), W(3) (15)
- Ch 1, 1 Light brown sc dec, W(3), LB(1), W(3), LB(1), W(3), 1 Light brown sc dec (13)
- Ch 1, LB(2), W(1), LB(3), W(1), LB(3), W(1), LB(2) (13)
- Ch 1, 1 Light brown sc dec, LB(9), 1 Light brown sc dec (11). Fasten off and weave-in the ends.
Repeat a second front panel.
Back Panels:
Start at the bottom left corner and “zig-zag” your way up as shown in the example picture on the “Front Panel” section. Repeat twice to have two panels.

This change should be introduced on row 11.
- W: White
- T: Teal
- B: Blue
Starting with White yarn:
- Ch 18, turn, skip the first chain and sc across (17)
- Ch 1, W(1), T(1), W(1), T(1), W(4), T(1), W(3), T(1), W(3), T(1) (17)
- T(1), W(1), T(1), W(3), T(1), W(1), T(1), W(5), T(1), W(2) (17)
- W(1), T(3), W(4), T(1), W(3), T(1), W(3), T(1) (17)
- T(1), W(2), T(3), W(2), T(1), W(4), T(1), W(1), T(1), W(1) (17)
- W(1), T(3), W(4), T(1), W(3), T(1), W(3), T(1) (17)
- T(1), W(1), T(1), W(3), T(1), W(1), T(1), W(5), T(1), W(2) (17)
- W(8), T(1), W(3), T(1), W(3), T(1) (17)
- T(1), W(2), T(3), W(2), T(1), W(4), T(1), W(1), T(1), W(1) (17)
- W(2), T(1), W(5), T(1), W(3), T(1), W(3), T(1) (17)
- From here on, everything will be worked in the navy yarn. Ch 1, sc 9, ch 7, skip 7 stitches and sc 1 into the last stitch available. This creates the thumb opening. (17)
12 – 29: Ch 1, sc across (17) (18 rows) If you added any extra rows to the front panels for extra length, add the same number of extra rows here
30. Ch 1, 1 sc dec, 13 sc, 1 sc dec (15)
31. Ch 1, 15 sc (15)
32. Ch 1, 1 sc dec, 11 sc, 1 sc dec (13)
33. Ch 1, 13 sc (13)
34. Ch 1, 1 sc dec, 9 sc, 1 sc dec (11)
Thumbs:
Worked in the round using navy yarn. Repeat twice for two thumbs
- MC, sc 7 into the circle, place stitch marker (7)
- 7 sc inc, move stitch marker (14)
- – 14: Sc around (14) (12 rounds). Fasten off, leaving a 4 inch tail for sewing.
Assembly:
Now you’ll sew all the pieces together. I recommend the “Mattress stitch”.
The front panels can be sewn facing either way, choose the side you like most to face outside. The back panels should be facing opposite sides so that you have a left thumb opening and a right one. The backs need to be mirrors of each other.
Using a 24 inch long light brown strand, sew around both mittens leaving the bottom open. Sew a thumb sleeve to each mitten using the mattress stitch as well, being careful not to tighten the stitches too much as this could result in a smaller opening. Weave-in the ends.

Cuffs:
- Lastly, using dark brown yarn, sc around the base of the mitten (34)
- Ch 2, alternate bp dc and fp dc all around (34)
- Ch 2, alternate bp dc and fp dc all around (34). Fasten off and weave-in the ends.
And you’re done!
Thank you for using my pattern ♥

I’D LOVE TO SEE YOUR PROJECTS! IF YOU HAVE PROGRESS PICTURES OR WANT TO SHARE YOUR FINISHED PROJECT PLEASE TAG THE GRUMPY GRANNY ON SOCIAL MEDIA
You may sell your product providing pattern credit to The Grumpy Granny on Twitch, TikTok, Instagram, Etsy, Facebook, Pinterest, Ravelry: @the.grumpy.granny or any other social media in which you advertise. The pattern itself shall not be copied. If you sell the items you must use your own pictures for advertising. If you need assistance during the process, if someone else is selling my pattern, or you just want to say hi, feel free to contact me on social media or email me at la.grumpy.granny@gmail.com